aaahhh... but remember m'lord, I had to go into almost as much detail just to get you to seriously consider the idea that the DS1 wasnt actually moving towards Y4 in ANH, but was instead depending solely upon Y4's orbital motion to do the job of bringing it into firing position... remember?
DS acceleration at Yavin (split from "practicality of m
Moderator: Vympel
-
Shaka[Zulu]

- Jedi Knight
- Posts: 517
- Joined: 2002-08-20 03:24am
- Location: Ft. Lauderdale, FL USA
DS acceleration at Yavin (split from "practicality of m
[Split from "practicality of mechs" in OSF forum, immediately following my request for him to keep him 20-30 subtopic "thesis" down to a manageable length- DW]
aaahhh... but remember m'lord, I had to go into almost as much detail just to get you to seriously consider the idea that the DS1 wasnt actually moving towards Y4 in ANH, but was instead depending solely upon Y4's orbital motion to do the job of bringing it into firing position... remember?
aaahhh... but remember m'lord, I had to go into almost as much detail just to get you to seriously consider the idea that the DS1 wasnt actually moving towards Y4 in ANH, but was instead depending solely upon Y4's orbital motion to do the job of bringing it into firing position... remember?
panty-stealing military mecha maniac
-
Darth Wong

- Sith Lord

- Posts: 70028
- Joined: 2002-07-03 12:25am
- Location: Toronto, Canada
- Contact:
And which turned out to be incorrect; while my acceleration estimate was not precise (not that it was ever claimed to be), your numbers did not work out at all, remember? IIRC, you had to go to Curtis before you would acknowledge a problem ... and you completely dismissed the viewscreen, which is the only real data we have on the location and movement of the Death Star.Shaka[Zulu] wrote:aaahhh... but remember m'lord, I had to go into almost as much detail just to get you to seriously consider the idea that the DS1 wasnt actually moving towards Y4 in ANH, but was instead depending solely upon Y4's orbital motion to do the job of bringing it into firing position... remember?

"you guys are fascinated with the use of those "rules of logic" to the extent that you don't really want to discussus anything."- GC
"I do not believe Russian Roulette is a stupid act" - Embracer of Darkness
"Viagra commercials appear to save lives" - tharkûn on US health care.
http://www.stardestroyer.net/Mike/RantMode/Blurbs.html
-
Shaka[Zulu]
- Jedi Knight
- Posts: 517
- Joined: 2002-08-20 03:24am
- Location: Ft. Lauderdale, FL USA
ooo boy here it goes again.... 
as i remember it, it wasnt so much as a dismissal of the rebel viewscreen, rather a different interpretation of what it was showing, given that it was already out of scale, and was also almost certainly using a different frame of reference -- one based upon the line bisecting the centers of both Yavin and Y4, as the moon was never shown to move, yet the DS was (nice for those in the rebel bunker as a countdown to doom, but little else). as far as accurate data regarding viewscreen representation of the motion of the bodies concerned, I considered the DS viewscreen as being the stronger evidence... it showed the orbital paths of Yavin's moons (to scale no less), yet not the projected path of the DS itself (or any change in the sizes of either Yavin or Y4 over that 30 minutes, implying an unmoving position), it showed Y4 coming around the far side approaching perigee etc etc... It was never shown how my numbers were off, even though they were based upon Curtis' data (my calcs AFAIK were spot on given that data, with several minutes worth of leeway either way), and while I could have replicated his effort to arrive at my own starting figures for the orbital elements of the bodies involved, I beleive we can agree that they are accurate enough for a proper determination. What it boils down to is this: You preferred the depiction shown by the rebel display, while I preferred the one presented on the DS bridge -- a difference of opinion that leads to vastly different conclusions. You say the DS was accelerating, I say the moon was... you say po-tay-to I say po-tah-to
maybe I should finally do that Orbiter simulation of the ANH and ROTJ (battle of Endor) scenarios... hmmmm.... this needs its own thread...
panty-stealing military mecha maniac
-
Darth Wong
- Sith Lord
- Posts: 70028
- Joined: 2002-07-03 12:25am
- Location: Toronto, Canada
- Contact:
You "interpreted" it to be grossly out of scale and therefore basically irrelevant, as if it's inconceivable to have a display unit that replaces objects with enlarged icons for easy viewing but still displays their relative positions (or one would wonder what it's good for).Shaka[Zulu] wrote:ooo boy here it goes again....
as i remember it, it wasnt so much as a dismissal of the rebel viewscreen, rather a different interpretation of what it was showing, given that it was already out of scale, and was also almost certainly using a different frame of reference -- one based upon the line bisecting the centers of both Yavin and Y4, as the moon was never shown to move, yet the DS was (nice for those in the rebel bunker as a countdown to doom, but little else).
Except for the oh-so minor little detail that if we assume a stationary DS toward which Yavin 4 approaches, the resulting orbital velocity for Yavin 4 would be many times greater than escape velocity at that altitude, so the moon would have shot off into space on a hyperbolic open orbit. Not to mention the other little detail that such profound acceleration on the part of Yavin 4 would be noticeable by the people on its surface. Both minor issues, reallyas far as accurate data regarding viewscreen representation of the motion of the bodies concerned, I considered the DS viewscreen as being the stronger evidence... it showed the orbital paths of Yavin's moons (to scale no less), yet not the projected path of the DS itself (or any change in the sizes of either Yavin or Y4 over that 30 minutes, implying an unmoving position), it showed Y4 coming around the far side approaching perigee etc etc... It was never shown how my numbers were off, even though they were based upon Curtis' data (my calcs AFAIK were spot on given that data, with several minutes worth of leeway either way), and while I could have replicated his effort to arrive at my own starting figures for the orbital elements of the bodies involved, I beleive we can agree that they are accurate enough for a proper determination. What it boils down to is this: You preferred the depiction shown by the rebel display, while I preferred the one presented on the DS bridge -- a difference of opinion that leads to vastly different conclusions. You say the DS was accelerating, I say the moon was... you say po-tay-to I say po-tah-to
An artificial battle station can accelerate through an orbit at velocities many times greater than escape velocity. A natural moon cannot.
I wouldn't waste your time, if I were you.maybe I should finally do that Orbiter simulation of the ANH and ROTJ (battle of Endor) scenarios... hmmmm.... this needs its own thread...
"you guys are fascinated with the use of those "rules of logic" to the extent that you don't really want to discussus anything."- GC
"I do not believe Russian Roulette is a stupid act" - Embracer of Darkness
"Viagra commercials appear to save lives" - tharkûn on US health care.
http://www.stardestroyer.net/Mike/RantMode/Blurbs.html
-
Shaka[Zulu]
- Jedi Knight
- Posts: 517
- Joined: 2002-08-20 03:24am
- Location: Ft. Lauderdale, FL USA
the DS did notDarth Wong wrote: You "interpreted" it to be grossly out of scale and therefore basically irrelevant, as if it's inconceivable to have a display unit that replaces objects with enlarged icons for easy viewing but still displays their relative positions (or one would wonder what it's good for).
Mike, I believe have shown with sufficient certainty why the rebel display cannot be trusted, especially when compared the that on the DS. On the rebel display, neither Yavin or Y4 moved, when it has already been well established that Y4 was nearing perigee in its' orbit of Yavin... a period during which (given its' obvious highly eccentric orbit as shown on the DS viewscreen) it would by necessity be a) accelerating in both true orbital velocity and angular velocity wrt Yavin (but still within the escape limit) and b) decreasing in altitude over Yavin. The fact that the rebel display shows none of this is damning evidence. As to the display's purpose, I have already stated that said purpose was likely as a simple countdown clock to doom, and nothing more -- in that function, size relationships and proper display of motion would not be necessary (in fact such information would be downright distracting).
Except for the oh-so minor little detail that if we assume a stationary DS toward which Yavin 4 approaches, the resulting orbital velocity for Yavin 4 would be many times greater than escape velocity at that altitude, so the moon would have shot off into space on a hyperbolic open orbit. Not to mention the other little detail that such profound acceleration on the part of Yavin 4 would be noticeable by the people on its surface. Both minor issues, really
the moon wasnt approaching the DS, rather it was approaching perigee (and was never in danger of exceeding escape velocity)... the DS, due to its position, didnt even have to wait till Y4 perigee to fire... just until it had a clear line of sight. no massive accelerations were necessary on anyone's part except the fighters racing to get to target.
An artificial battle station can accelerate through an orbit at velocities many times greater than escape velocity. A natural moon cannot.
the DS did not have to
the DS likely could not at anywhere near the rate you propse even if it wanted to (DS2 is another story)
the moon was just going about its' business, as moons are wont to do
perhaps I should submit my original paper on the subject to the board... hmmm
panty-stealing military mecha maniac
-
Shaka[Zulu]
- Jedi Knight
- Posts: 517
- Joined: 2002-08-20 03:24am
- Location: Ft. Lauderdale, FL USA
-
Spanky The Dolphin

- Mammy Two-Shoes
- Posts: 30776
- Joined: 2002-07-05 05:45pm
- Location: Reykjavík, Iceland (not really)
Stay on the fucking topic.
I sure as hell don't want to read your paper, Shaka[Zulu]. Sounds really boring and nothing but recycling information I already know.
I sure as hell don't want to read your paper, Shaka[Zulu]. Sounds really boring and nothing but recycling information I already know.

I believe in a sign of Zeta.
[BOTM|WG|JL|Mecha Maniacs|Pax Cybertronia|Veteran of the Psychic Wars|Eva Expert]
"And besides, who cares if a monster destroys Australia?"
-
Darth Wong
- Sith Lord
- Posts: 70028
- Joined: 2002-07-03 12:25am
- Location: Toronto, Canada
- Contact:
Yavin 4 does not exceed escape velocity? Given a Yavin mass/diameter of 5E27 kg and 200,000km, and a closest approach of, say, 350,000km, escape velocity is less than 45 km/s. If Yavin 4 is moving at less than 45 km/s, it will take 5 minutes just to cover one planetary diameter. This would imply that it was just barely over Yavin's horizon when the DS arrived.
That doesn't seem to match what we see (or hear; the line "orbiting the planet at maximum velocity" seems rather curious if the DS is completely stationary as you say, and "far side of the planet" seems like an odd way to say "a couple of degrees over the horizon").
Of course, it's entirely possible that my math is fucked, but I'm sure you'll let me know if it is.
"you guys are fascinated with the use of those "rules of logic" to the extent that you don't really want to discussus anything."- GC
"I do not believe Russian Roulette is a stupid act" - Embracer of Darkness
"Viagra commercials appear to save lives" - tharkûn on US health care.
http://www.stardestroyer.net/Mike/RantMode/Blurbs.html
-
Shaka[Zulu]
- Jedi Knight
- Posts: 517
- Joined: 2002-08-20 03:24am
- Location: Ft. Lauderdale, FL USA
Spanky The Dolphin wrote:Stay on the fucking topic.
I sure as hell don't want to read your paper, Shaka[Zulu]. Sounds really boring and nothing but recycling information I already know.
for one thing, I agree... back on topic -- swearing not necessary.
second, what? orbital mechanics is boring? not to me...
third, what exactly is it that you think you know?
jeeze... this is what I get for merely attempting to give a more balanced analysis of mech practicality (a subject that I have always had an interest in), and providing an example of just why I go to the detail I do -- if I dont, people just wave their hands in unjust dismissal, and when I do, they refuse to acknowledge it.
panty-stealing military mecha maniac
-
Spanky The Dolphin
- Mammy Two-Shoes
- Posts: 30776
- Joined: 2002-07-05 05:45pm
- Location: Reykjavík, Iceland (not really)
-
Shaka[Zulu]
- Jedi Knight
- Posts: 517
- Joined: 2002-08-20 03:24am
- Location: Ft. Lauderdale, FL USA
remember that we are dealing to a far greater degree with angular velocity here than with actual velocity. I advise you again to look at the DS screen as the 30 minute countdown begins... Y4 IS within a scant few diameters of passing out from the limb of Yavin at the start from the POV of the DS... I beg you to look at it from the DS frame of reference for once...Darth Wong wrote:Yavin 4 does not exceed escape velocity? Given a Yavin mass/diameter of 5E27 kg and 200,000km, and a closest approach of, say, 350,000km, escape velocity is less than 45 km/s. If Yavin 4 is moving at less than 45 km/s, it will take 5 minutes just to cover one planetary diameter. This would imply that it was just barely over Yavin's horizon when the DS arrived.
I have never heard exactly to what body that phrase refers to... is it the DS or Y4? it could apply to either, as since Y4 is approaching perigee, it would be within a reasonable % of 'orbiting the planet at maximum velocity' wether that velocity is actual or angular... as for the 'far side of the planet' quote, that can easily be construed within a considerable range of possible locations ie anything on the side of Yavin which the DS cannot see is by definition the far side -- a more accurate phrase would be 'directly opposite our position on the far side of the planet'. it matches the DS screen display perfectly... about the only things you seem to be able to use to counter my work is the rebel display and those two vague phrases... English is a highly variable language, all too easy to use poorly (leading to confusion and misunderstanding) -- yet capable of incredible precision when used properly. no spoken evidence you have cited is of the precise variety.That doesn't seem to match what we see (or hear; the line "orbiting the planet at maximum velocity" seems rather curious if the DS is completely stationary as you say, and "far side of the planet" seems like an odd way to say "a couple of degrees over the horizon").
fucked? no... based upon the wrong frame of reference, yesOf course, it's entirely possible that my math is fucked, but I'm sure you'll let me know if it is.
panty-stealing military mecha maniac
-
Shaka[Zulu]
- Jedi Knight
- Posts: 517
- Joined: 2002-08-20 03:24am
- Location: Ft. Lauderdale, FL USA
-
Darth Wong
- Sith Lord
- Posts: 70028
- Joined: 2002-07-03 12:25am
- Location: Toronto, Canada
- Contact:
Irrelevant. Actual velocity defines kinetic energy, which in turn determines whether the moon is in a captured orbit or whether it will fly away.Shaka[Zulu] wrote:remember that we are dealing to a far greater degree with angular velocity here than with actual velocity.
You mean like this?I advise you again to look at the DS screen as the 30 minute countdown begins... Y4 IS within a scant few diameters of passing out from the limb of Yavin at the start from the POV of the DS... I beg you to look at it from the DS frame of reference for once...
Funny ... Yavin 4 appears to be almost directly opposite the DS, and many tens of thousands of km away from the horizon even in a flat plane, never mind 3D (look at where the brown dot is). In fact, when you look at the display, it's almost directly opposite the DS on the far side of the planet, hence the fact that it appears to be near the middle of the big circle, ie- Yavin.
"you guys are fascinated with the use of those "rules of logic" to the extent that you don't really want to discussus anything."- GC
"I do not believe Russian Roulette is a stupid act" - Embracer of Darkness
"Viagra commercials appear to save lives" - tharkûn on US health care.
http://www.stardestroyer.net/Mike/RantMode/Blurbs.html
-
CmdrWilkens

- Emperor's Hand
- Posts: 9093
- Joined: 2002-07-06 01:24am
- Location: Land of the Crabcake
- Contact:
You might also want to point out to him that the relative position of Yavin 4 does change on the Rebel's tactical display. The change is relatively small but it does move. I'll try to post screenshots later today but taking the point where the Blue, Black, and Green meet on the Yav4 icon and comparing its position against a single black dot stationary on the north side (as we face it) of Yavin 4. Now the change is over a distance of about 6 pixels and my margin of error is about 4 (+/- 2) so I'm gonna try to grab a better resolution and try again but if I can't I'll still try to have those screencaps up by days end.Darth Wong wrote:You mean like this?
Funny ... Yavin 4 appears to be almost directly opposite the DS, and many tens of thousands of km away from the horizon even in a flat plane, never mind 3D (look at where the brown dot is). In fact, when you look at the display, it's almost directly opposite the DS on the far side of the planet, hence the fact that it appears to be near the middle of the big circle, ie- Yavin.

SDNet World Nation: Wilkonia
Armourer of the WARWOLVES
ASVS Vet's Association (Class of 2000)
Former C.S. Strowbridge Gold Ego Award Winner
MEMBER of the Anti-PETA Anti-Facist LEAGUE
ASVS Vet's Association (Class of 2000)
Former C.S. Strowbridge Gold Ego Award Winner
MEMBER of the Anti-PETA Anti-Facist LEAGUE
"I put no stock in religion. By the word religion I have seen the lunacy of fanatics of every denomination be called the will of god. I have seen too much religion in the eyes of too many murderers. Holiness is in right action, and courage on behalf of those who cannot defend themselves, and goodness. "
-Kingdom of Heaven
-
Shaka[Zulu]
- Jedi Knight
- Posts: 517
- Joined: 2002-08-20 03:24am
- Location: Ft. Lauderdale, FL USA
ok... snipping myself for brevity's sake
Mike... the simple fact of the matter is that the moon has an orbital eccentricity of less than 1. Therefore it cannot under any circumstances exceed escape velocity at any point during its' orbit! All of my calculations in the paper were based upon this, and they all bear out within a reasonable range, even when altering the axis of Y4's orbit such that apogee occurs either closer towards or farther away from the DS!

one must recognize in this instance, that the original image was taken from a screen with limited resolution, which was at the time displaying a schematic of the entire Yavin moon system. Due to this, a limited # of pixels (or whatever the Imps call their screen dots) were available to each body involved. I have sharpened the image considerably after magnification, in the hopes of dispelling the illusion this causes. As you can see, Y4 is quite a bit past Yavin's centerline from the DS perspective. Quite frankly, I much prefer the screen which follows that one:
as should be obvious in this shot, Y4's position is shown with exactly 30 minutes 9 seconds left to 'target in range' status. all it takes is a simple act of placing a ruler against your screen, so that 0 marks Y4's trailing edge (the left side)... measure out how many cm or inches (your choice) equals one diameter of the moon, and then count out how many diatmeters it needs to travel before said trailing edge is clear of Yavin (again from the perspective of the DS), it should add up to just a tad over 3!
ugh... that does it... next post is the original paper!
Darth Wong wrote: Irrelevant. Actual velocity defines kinetic energy, which in turn determines whether the moon is in a captured orbit or whether it will fly away.
Mike... the simple fact of the matter is that the moon has an orbital eccentricity of less than 1. Therefore it cannot under any circumstances exceed escape velocity at any point during its' orbit! All of my calculations in the paper were based upon this, and they all bear out within a reasonable range, even when altering the axis of Y4's orbit such that apogee occurs either closer towards or farther away from the DS!
hmmm... is that the first bear trap I hear? I hereby present an enhanced version of that very image -- enlarged to show strictly Yavin and our favorite little mudball in this scenario, and sharpened to enhance our analytical pleasure...You mean like this?
Funny ... Yavin 4 appears to be almost directly opposite the DS, and many tens of thousands of km away from the horizon even in a flat plane, never mind 3D (look at where the brown dot is). In fact, when you look at the display, it's almost directly opposite the DS on the far side of the planet, hence the fact that it appears to be near the middle of the big circle, ie- Yavin.
one must recognize in this instance, that the original image was taken from a screen with limited resolution, which was at the time displaying a schematic of the entire Yavin moon system. Due to this, a limited # of pixels (or whatever the Imps call their screen dots) were available to each body involved. I have sharpened the image considerably after magnification, in the hopes of dispelling the illusion this causes. As you can see, Y4 is quite a bit past Yavin's centerline from the DS perspective. Quite frankly, I much prefer the screen which follows that one:
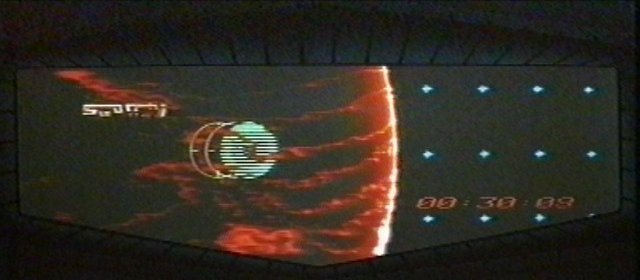
as should be obvious in this shot, Y4's position is shown with exactly 30 minutes 9 seconds left to 'target in range' status. all it takes is a simple act of placing a ruler against your screen, so that 0 marks Y4's trailing edge (the left side)... measure out how many cm or inches (your choice) equals one diameter of the moon, and then count out how many diatmeters it needs to travel before said trailing edge is clear of Yavin (again from the perspective of the DS), it should add up to just a tad over 3!
ugh... that does it... next post is the original paper!
panty-stealing military mecha maniac
-
Shaka[Zulu]
- Jedi Knight
- Posts: 517
- Joined: 2002-08-20 03:24am
- Location: Ft. Lauderdale, FL USA
well, I promised it, and here it is... please note that this is a direct copy without any alteration of the original paper I wrote on this topic (actually it was originally intended as a commentary on the performance capacities of the X-wing, but I digress) back in september of 1999. I am much more proficient in these matters now than I was then (and I was right even then!)
there it is... challenge it at your own peril!
Hello all...
I've finally completed the first in my series of orbital analyses
for certain battles in SW canon to establish lower bounds on SW
spacecraft propulsion capabilities... first however, thanks to Mike
Wong, for providing me with the impetus to disprove certain claims
regarding the propulsive abilities of SW ships in general, and Curt
Saxon, whose technical commentaries pages were of great benefit,
providing me with the basic astrophysical data on the bodies in
question. I must say it continues to be an interesting challenge, and
hope others will duplicate the excercise for the sake of external
verification.
To provide some background... I am certain that most of you are
aware of the debate that has been raging concerning the comparison of ST
and SW sublight propulsion... lately, the warsies seem to have been
hammering the idea that even the Death Star can accelerate at sizeable
fractions (by Mike Wong's estimate, as much as 10%) of the known rate
for the Galaxy class of starship in ST (which is firmly established as
1000g), and that Star Destroyers can exceed those capabilities by as
much as 3x. As evidence, the warsies have cited the ANH battle of
Yavin, where the original Death Star (hereafter referred to as DS1) was
seen to come into LOS of Yavin 4 (Y4 from now on) after an apparent 30
minute circumnavigation of the Yavin gas giant (YGG or simply GG) --
other scenarios, to include the battle at Endor from ROTJ, and selected
other scenarios from 'official' literature (novels etc.) will be
discussed in other posts -- as an indication that the DS1 must be
capable of substantial acceleration... This particular thread will
definitively illustrate the fallacy of these assumptions wrt the DS1,
and will also serve to establish realistic upper and lower bounds on
the acceleration capabilities of typical fighter craft in the SW
universe, using data gathered from curt's pages, observation of the
available footage, and basic principles of orbital mechanics.
First, let us establish the baseline conditions for this scenario
from the film evidence. We have various external views of DS1 throught
the scenario, verbal cues, and tactical representations shown on
viewscreens in both the DS1's command center and the rebel command
bunker on Y4. The externals are straightforward, allowing us to
determine several facts... first, from the externals:
1. The DS1 was reasonably near to the Yavin GG... perhaps within
three times the GG's radius (which would place the range from DS1 to the
GG at about 1 light second) or closer, as the GG looms quite large in
the background -- it is quite possible that the DS was using its'
repulsorlifts to maintain either an unnaturally slow orbit or a
stationary 'trojan' position at that radius. Also, this position lies
at an acute angle to the GG's terminator (on the sunny side), not
parallel to it, as the terminator is clearly visible with some apparent
curvature.
2. The distance between the DS1 and Yavin does not change
appreciably during the scenario... it will be shown that for reasons of
orbital mechanics, it does not need to.
On to the tactical displays... it should be noted that there are
some important differences in how the two displays present
information... the tactical displays on the DS1 are to scale, showing
the GG, its' major moons and their orbits -- and later Y4's motion as it
moves from behind the GG, all from the DS1's first person point of view
-- this was all necessary information for the DS, and it is
understandable that it was shown... otoh, the display in the rebel
bunker is a 'not to scale' representation of the scenario, from a
third-person, 'god's eye' perspective, for the express (need I say
'obvious'?) purposes of facilitating the presentation of the effective
targeting cone of the DS superlaser, and coordinating the fighter
attack... it is reasonable to assume that, given the circumstances,
no-one on Y4 had any interest whatever in the orbital dynamics of the
situation -- it was more along the lines of 'how much time have we got
to kill that thing before it gets LOS on us????!!!!' now, the facts as
observed from the displays:
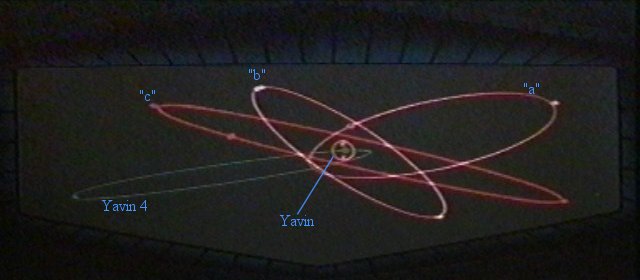
1. the DS display clearly establishes that the semi-major axis of
Y4's orbit is at an angle to both the DS1's position vector, shown as it
is in the first person perspective, and the Yavin day/night terminator.
This display also shows that Y4's apogee is to the far left of the
screen, while perigee is on the right, with the GG just to the left of
it.
2. the second display shown on the DS screen shows the GG,
greatly enlarged so that only a small portion of its' curvature is in
view, with Y4 behind it (by approximately 6.5 Y4 radii as measured from
Y4 center to the outermost portion of Yavin's curvature). Yavin is
shown to be moving out from behind the GG at a fairly rapid rate from
left to right -- if this depiction is oriented in the same plane as the
previous display on the screen -- there is no indication otherwise --
then Y4 may be assumed to be nearing, or perhaps has just passed
perigee.
3. when the 30 minute countdown is up, and Y4 is declared to be
in range, its' center as seen from the DS is only 1 radius out from the
GG's curvature. This information, combined with the previous 6.5 radii
observation (a grand total of 7.5 Y4 radii in apparent motion), will
later help to establish the angular motion of Y4 in its' orbit during
the countdown.
4. unfortunately, the rebel's tactical display is of
comparatively little use... the only contribution it makes to these
observations is the apparent acceleration of the DS during the 30 minute
period... I say 'apparent' because it is a misrepresentation -- the DS
is not accelerating wrt the GG... Y4 is...
and now, the verbal cues:
1. at the beginning, when we first see the DS display of the
Yavin group, a sensor operator is heard to say 'orbiting the planet at
maximum velocity... estimated time to firing range 30 minutes'... this
same operator proceeds to give updates almost every time we see the
display from now on. Strangely enough, this appears to be some kind of
mistake, as there is only one possible maximum velocity for a given
orbit with a nonzero eccentricity... velocity at perigee (for orbits
with an eccentricity of zero, there is only orbital velocity... any
slower is suborbital for that radius, while any higher velocity will
result in either a higher orbit or escape from the gravity well). Given
the conflict this velocity statement has with classic orbital mechanics,
there are three possibilites:
a) DS1 is using its' repulsorlifts to alter the apparent
magnitude of the gravity well to allow for a faster orbit
b) the DS1 is itself in an elliptical orbit and is passing
through perigee.
c) the statement does NOT refer to the DS1... rather to the
current velocity of Y4 -- if Y4 was nearing or passing through
perigee in its' orbit of yavin, it would be moving at its'
highest possible velocity.
Of these three possible explanations, the third -- that the
statement refers not to DS1 but to Y4 -- seems most plausible. 'a' is
unlikely, as the DS appears from the observed footage to be moving more
slowly than would be normal for the apparent orbit, contrary to the
proposed theory (a task for which repulsorlifts are commonly used), 'b'
when the statement was made, the DS was obviously farther away from
Yavin than later in the countdown, indicating that maximum relative
velocity was reached later in the scenario.
2. from about the time we first see the rebel display, just after
the fighters launch from the surface, another (rebel this time) sensor
operator is known to call out updates... they dont have any real
bearing on the analysis, serving only as an alternate version of the
countdown clock -- the only time indices of importance are the beginning
of the 30 minute countdown, the 15 minute mark which coincides with the
start of the fighter attack, and the declaration of LOS.
>From the observations above, it is now possible to arrive at a working
theory for the scenario:
DS1 had assumed a station keeping position on the far side
of Yavin from Y4, at a range of about 1 light second from the
GG's center, using its' repulsorlifts to maintain itself in a
stationary trojan-style orbit... thus situated, it had only to
wait for the moon's orbit to bring it into view, which would
happen shortly, as the moon had just reached its' orbital
perigee, and was thus moving out from behind Yavin at the
highest possible real and angular velocites for its' orbit.
We know that the DS holding position was not directly opposite
from Y4's perigee (with the initial vector passing through the
center of Yavin) because, at the time the operator's voice
clearly states '... orbiting the planet at maximum velocity'
the DS tactical display clearly illustrates that Y4's center
is only 6.5 Y4 radii from the outer edge of the GG as seen
from the DS's perspective (not the requisite 10.5 Y4 radii
which would indicate a position directly opposite)-- at the
end of the countdown, Y4's center is 1 radius outside the GG,
making for a total apparent motion of 7.5 radii. This is a
simple of theory to calculate, as it has relatively few
components in motion.
In order to establish the positional relationships for this
scenario, it is helpful to plot the GG, Y4 and its' orbital path around
the GG -- to the proper scale of course -- on a sheet of 17"*22" 10
sq/in graph paper (it helps to visualize the system). The necessary
numbers follow:
known constants from curt's pages, with additions based on my own
calculations (formulae are shown where applicable):
map scale: 2.0E8 m per inch (2.0E5 km/in)
YGG:
mass: 5.299E27 kg
radius: 9.6239E7 m (96239 km)
Y4:
mass: ? (not significant for purposes of this
analysis)
radius: 6.55E6 m (6550 km)
semi-major axis (a): 1.2E9 m (minimum)
semi-minor axis (b): 6.511E8 m (minimum) -- calculated
from the formula e=(1-(b^2/a^2))^.5
eccentricity (e): 0.84 (minimum)
orbital period (P): 122 hours (minimum)
radius of perigee (rp): 1.92E8 m (based on above
data, rp=a(1-e))
radius of apogee (ra): 2.208E9 m (based on above
data, ra=a(1+e))
Using the above data points, in conjunction with the formula for the
polar equation of a conic section, which gives the magnitude of the
position vector for a satellite in orbit,
r=(a(1-e^2))/(1+ecosv)
r and a both must be in same units of distance
v is the polar angle (aka true anomaly) in either degrees or
radians, measured from perigee=0, apogee=180 degrees or 3.142
radians
I proceeded to map out the last 90 degrees of the orbital path of Y4 in
15 degree increments and 'connected the dots', making sure to use an
appropriate curvature. For an approximate representation of my working
diagram, please see the attached .bmp file...
Nomenclature and applicable formulas:
A. Constants and variables:
G Universal gravitational constant 6.67E-17
N*km^2/kg^2
e! specific mechanical energy -- values less than
zero define closed orbits, while equal to or greater
than zero define open, ie escape trajectories
V velocity
m' gravitational constant for a given mass
m1 primary mass
m2 secondary mass
r radius
a semi-major axis of a given objects' orbit
e eccentricity
v true anomaly, the angular component of the
satellites current orbital position, where 0 degrees
or radians = perigee(depending on the equation, will
be in either degrees or radians)
rp radius of perigee
ra radius of apogee
P orbital period
n mean motion (in radians/second)
E eccentric anomaly (radians)
M mean anomaly (radians)
t-t0 time of flight from one angular position in
orbit to another in seconds
B. equations
1. attractive force F between two bodies of known
mass and separation distance d:
F (in newtons) =(-Gm1m2)/d^2
2. polar equation of a conic section (gives the
magnitude of the position vector in terms of the
vector's location in the orbit):
r (in km) =a(1-e^2)/(1+ecosv)
3. e! (energy) for a given orbit. can also
determine Vescape for any given distance r by
setting e! to zero and solving for V, or the
circular velocity for a e=0 orbit by setting a equal
to r, and solving for V
e!=(V^2/2)-(m'/r)=(-m')/2a
4. a (semi-major axis in km)
a=-m'/(2e!)=(ra+rp)/2
5. e (eccentricity)
e=1-(rp/a)=(ra/a)-1
6. rp (radius of perigee in km) =a(1-e)
7. ra (radius of apogee in km) =a(1+e)
8. P (orbital period) =2pi(a^3/m')^-2 P in
minutes
9. n (mean orbital motion in rad/sec)
=(m'/a^3)^-2
10. E (eccentric anomaly in radians): cos
E=(e+cosv)/(1+ecosv)
11. M (mean anomaly in radians)
=E-esinE=M0+n(t-t0)
12. t-t0 (elapsed time) =(M-M0)/n
As ti happens, there is at least one solution for this theory which
works out perfectly... if the major axis of Y4's orbit lies 30 degrees
off the line of the terminator on Yavin, such that Y4's perigee is on
the sunny side of the GG, and DS1's position lies at 200000km from
Yavin, at an angle of +19 degrees on the sunny side of the GG
terminator, Y4 comes into LOS with DS1 just as it reaches perigee...
thus, the line from Yavin's center to Y4 at the beginning of the
scenario defines a true orbital motion of 30 degrees for Y4... From the
above calculations, we know that Y4 takes 30 minutes and 2 seconds to
travel through the last 30 degrees of its orbit to perigee, which fits
quite nicely within the parameters set in the film. It should also be
noted that this solution is fairly independent of the range of the DS to
Yavin, as changing that variable has no effect on the true anomaly.
on to the fighter performance analysis (based on the above scenario of
course)...
Since we are extremely time limited for the fighter transit from Y4
to the DS -- the absolute minimum range between the two at the initial
time for the scenario is at least 400kkm -- any normal intercept orbit
approach is out, as the fastest conventional transfer orbit would take
just under 2 hours to complete. This necessitates the argument that the
fighters were under heavy acceleration for the entire transit, using
their repulsorlifts to ignore the gravity well of Yavin. If the
fighters launched at the 30 minute mark, they would have only 15 minutes
to complete the transit, as combat is known to begin at roughly the 15
minute mark. To accomplish the transit in the necessary timeframe, the
fighters would have had to accelerate at a minimum rate of 211g to the
halfway point (covering ~200kkm in 7.5 minutes or less, at an average
velocity of 466.67km/sec, although this could be slightly less as they
benefit from Y4's initial orbital velocity at the time, on the order of
42 km/sec), with a subsequent deceleration at the same rate to arrive at
rest relative to the DS. Later launch times serve to compress the time
window (although the range does not substantially change until after the
15 minute mark due to the orbital motion of Y4), necessitating higher
acceleration. While it can be argued that the fighters were wasting no
time in getting to the DS, thus accelerating at their maximum rate, the
scenes in the rebel hangar following the 30 minute mark serve to cast
some uncertainty on the exact timing of the fighter launch, leaving the
211g rate as a reasonable lower bound on the fighter's maximum g
rating. Note that under the orbital scenario described, even if the
fighters did not launch until the 20 minute mark, they would not have
had to accelerate at a rate beyond 2000g to cover the distance in time,
so this figure can serve as an upper bound. Such performance, wether it
be the lower or higher figure, can be considered to be a typical
expectation of fighter performance in the SW universe, with larger ship
types being comparatively sluggish (increasingly so as size increases),
although larger types would probably be able to maintain their maximum
rates for much longer periods and to higher relativistic velocities, due
to increases in engine specific impulse with size, as well as much
larger reaction mass reserves.
Please forgive any typos or apparent grogginess... I had to piece this
together over the course of the last 2 months, squeezing it into the
temporal cauldron that passes for my life at the moment (doing the math
was easy -- writing this analysis of my results was a royal pain in the
@$$)... but please feel free to comment on any items that seem seriously
mistaken. The analysis of the Battle for Endor is coming, but it might
be another 2 months... I will make every effort to reply to responses
to this post in the meantime.
aaaahhhh... done... except for my references...
1. _Space_Propulsion_Analysis_and_Design_, by Humble, Henry and
Larson, ISBN 0-07-031320-2, McGraw Hill space technology series.
2. _Introduction_to_Space_Dynamics_, by Thomson, ISBN 0-486-65113-4,
Dover.
--------------------------------------------------------------------------------

there it is... challenge it at your own peril!
panty-stealing military mecha maniac
-
Shaka[Zulu]
- Jedi Knight
- Posts: 517
- Joined: 2002-08-20 03:24am
- Location: Ft. Lauderdale, FL USA
CmdrWilkens wrote: You might also want to point out to him that the relative position of Yavin 4 does change on the Rebel's tactical display. The change is relatively small but it does move. I'll try to post screenshots later today but taking the point where the Blue, Black, and Green meet on the Yav4 icon and comparing its position against a single black dot stationary on the north side (as we face it) of Yavin 4. Now the change is over a distance of about 6 pixels and my margin of error is about 4 (+/- 2) so I'm gonna try to grab a better resolution and try again but if I can't I'll still try to have those screencaps up by days end.
6 pixels +/- 2 pixels over the course of 30 minutes is not statistically significant given the preponderance of orbital data available for the bodies involved... for all we know it might have been the result of a degauss cycle...
panty-stealing military mecha maniac
-
Shaka[Zulu]
- Jedi Knight
- Posts: 517
- Joined: 2002-08-20 03:24am
- Location: Ft. Lauderdale, FL USA
-
Patrick Degan

- Emperor's Hand
- Posts: 14847
- Joined: 2002-07-15 08:06am
- Location: Orleanian in exile
Three fundamental errors in your argument, Zulu
From what I see, you made several critical errors in your entire approach to this problem:
1. You are arguing from the premise that the Death Star cannot be accomplishing the velocity necessary to close to intercept with Yavin-D and are trying to contort the evidence to fit the conclusion.
2. You are arbitrarily dismissing the Rebel tactical display as unreliable evidence.
3. You are assuming that the Death Star's ranging display is representing the true orbital velocity of Yavin-D, and this on the assumption that the Death Star is simply occupying a stationary position or a geostationary orbit and "waiting" for Yavin-D to move out of opposition on its own momentum.
Of these, the first is the fundamental error which undermines your entire case. You are assuming the premise of the argument as proof of the argument.
-
Darth Wong
- Sith Lord
- Posts: 70028
- Joined: 2002-07-03 12:25am
- Location: Toronto, Canada
- Contact:
(sigh) and I will say the same thing I said last time. You are taking one piece of data, discarding everything that doesn't fit, and declaring that because you can mathematically make it fit your model, your model must be correct and all contradictory evidence must be junk.
This approach is fundamentally unsound. When the DS controller said "We are preparing to orbit the planet", I did not get the impression that this was some kind of exotic Imperial code-language for "we will remain stationary while Yavin 4 comes to us". And despite all of your objections, when the DS controller subsequently said "Orbiting the planet at maximum velocity", he was obviously referring to the Death Star, not Yavin 4.
You fastidiously explain, therefore, why we should ignore A) the Rebel display and B) the DS controller's dialogue because your model happens to fit your assumptions once you remove these annoying pieces of evidence from the picture. However, that is simply not reasonable, and you know it. The Death Star's range from Yavin was chosen to be large by you so that Yavin 4 would come into LOS sooner (the closer the DS is to Yavin, the more Yavin's bulk will block LOS, hence damaging your theory). There is no particular reason to assume that this is the case, and your implicit claim that the Death Star's display should be assumed superior to the Rebel display is highly questionable, to say the least. As Patrick points out, your logic is basically circular.
Moreover, you completely missed the whole point of CmrWilkens' "movement by six pixels" rebuttal. You see, you treat the DS onscreen display as absolute, and completely ignore the dialogue as well as the Rebel display screen, making excuses for both. But the DS display screen you cite is standing disproof of your claim! The Death Star moves 6 pixels not in half an hour as you say, but in one second of onscreen time! Look at these pics:


I repeat: ONE SECOND!
The planet moves roughly one tenth of its own diameter in one second! From this image, the planet is moving at more than a thousand kilometres per second!!! Still think it's not exceeding escape velocity? Here, do you want a DIVX clip of the scene? The rate of movement is HUGE in that display.
You can float your smokescreens of superfluous details all you like, but the fact is that even if we ACCEPT your method of making excuses to ignore the DS controller's dialogue and the Rebel onscreen display and adopt the DS display as the only valid one, it shows that Yavin 4 could not POSSIBLY have been producing the entire rate of closure by itself, unless you think the planet could have seriously been moving at more than a thousand km/s through its natural orbit.
In other words, either accept the Rebel display as more valid than this one, or accept this one and conclude that Yavin 4 and the DS were rotating toward each other at more than a thousand km/s (with most of this velocity obviously coming from the DS, since Yavin 4 would fly off into space if it were moving this quickly). The most long-winded analysis in the world won't make up for a fundamental refusal to look at the entire body of evidence. You actually had the gall to produce a screenshot similar to the above on the previous page, out of context, while pretending not to notice that the planet is obviously moving so quickly in the display that it shoots your theory to hell!
It's one thing to disagree, but you come at me with this sarcastic air of superiority, a huge dissertation which could easily have been one tenth as long, and your eye-rolling icons while ignoring blindingly obvious observations such as this one, and you wonder why I don't take it seriously? You may be handy with graph paper and math, but your entire approach is fundamentally unsound.
This approach is fundamentally unsound. When the DS controller said "We are preparing to orbit the planet", I did not get the impression that this was some kind of exotic Imperial code-language for "we will remain stationary while Yavin 4 comes to us". And despite all of your objections, when the DS controller subsequently said "Orbiting the planet at maximum velocity", he was obviously referring to the Death Star, not Yavin 4.
You fastidiously explain, therefore, why we should ignore A) the Rebel display and B) the DS controller's dialogue because your model happens to fit your assumptions once you remove these annoying pieces of evidence from the picture. However, that is simply not reasonable, and you know it. The Death Star's range from Yavin was chosen to be large by you so that Yavin 4 would come into LOS sooner (the closer the DS is to Yavin, the more Yavin's bulk will block LOS, hence damaging your theory). There is no particular reason to assume that this is the case, and your implicit claim that the Death Star's display should be assumed superior to the Rebel display is highly questionable, to say the least. As Patrick points out, your logic is basically circular.
Moreover, you completely missed the whole point of CmrWilkens' "movement by six pixels" rebuttal. You see, you treat the DS onscreen display as absolute, and completely ignore the dialogue as well as the Rebel display screen, making excuses for both. But the DS display screen you cite is standing disproof of your claim! The Death Star moves 6 pixels not in half an hour as you say, but in one second of onscreen time! Look at these pics:
I repeat: ONE SECOND!
The planet moves roughly one tenth of its own diameter in one second! From this image, the planet is moving at more than a thousand kilometres per second!!! Still think it's not exceeding escape velocity? Here, do you want a DIVX clip of the scene? The rate of movement is HUGE in that display.
You can float your smokescreens of superfluous details all you like, but the fact is that even if we ACCEPT your method of making excuses to ignore the DS controller's dialogue and the Rebel onscreen display and adopt the DS display as the only valid one, it shows that Yavin 4 could not POSSIBLY have been producing the entire rate of closure by itself, unless you think the planet could have seriously been moving at more than a thousand km/s through its natural orbit.
In other words, either accept the Rebel display as more valid than this one, or accept this one and conclude that Yavin 4 and the DS were rotating toward each other at more than a thousand km/s (with most of this velocity obviously coming from the DS, since Yavin 4 would fly off into space if it were moving this quickly). The most long-winded analysis in the world won't make up for a fundamental refusal to look at the entire body of evidence. You actually had the gall to produce a screenshot similar to the above on the previous page, out of context, while pretending not to notice that the planet is obviously moving so quickly in the display that it shoots your theory to hell!
It's one thing to disagree, but you come at me with this sarcastic air of superiority, a huge dissertation which could easily have been one tenth as long, and your eye-rolling icons while ignoring blindingly obvious observations such as this one, and you wonder why I don't take it seriously? You may be handy with graph paper and math, but your entire approach is fundamentally unsound.
Last edited by Darth Wong on 2002-10-30 10:53pm, edited 1 time in total.
"you guys are fascinated with the use of those "rules of logic" to the extent that you don't really want to discussus anything."- GC
"I do not believe Russian Roulette is a stupid act" - Embracer of Darkness
"Viagra commercials appear to save lives" - tharkûn on US health care.
http://www.stardestroyer.net/Mike/RantMode/Blurbs.html
-
Spanky The Dolphin
- Mammy Two-Shoes
- Posts: 30776
- Joined: 2002-07-05 05:45pm
- Location: Reykjavík, Iceland (not really)
[offtopic]Dumb question, but what do you suppose those blue dots are in the display? Some kind of celestial grid or coordinate system?[/offtopic]
I believe in a sign of Zeta.
[BOTM|WG|JL|Mecha Maniacs|Pax Cybertronia|Veteran of the Psychic Wars|Eva Expert]
"And besides, who cares if a monster destroys Australia?"
-
Darth Wong
- Sith Lord
- Posts: 70028
- Joined: 2002-07-03 12:25am
- Location: Toronto, Canada
- Contact:
I'd guess they're some kind of scaling grid, although I'm not sure of its utility, given the fact that objects will look smaller if they're farther away. Maybe it's just a weird Geonosian thing.
"you guys are fascinated with the use of those "rules of logic" to the extent that you don't really want to discussus anything."- GC
"I do not believe Russian Roulette is a stupid act" - Embracer of Darkness
"Viagra commercials appear to save lives" - tharkûn on US health care.
http://www.stardestroyer.net/Mike/RantMode/Blurbs.html
-
SirNitram

- Rest in Peace, Black Mage
- Posts: 28367
- Joined: 2002-07-03 04:48pm
- Location: Somewhere between nowhere and everywhere
Of course, the fact this ignores all official evidence and probably all the canon evidence in the novels and radioplays is nothing for our intrepid paper-writer.
Manic Progressive: A liberal who violently swings from anger at politicos to despondency over them.
Out Of Context theatre: Ron Paul has repeatedly said he's not a racist. - Destructinator XIII on why Ron Paul isn't racist.
Shadowy Overlord - BMs/Black Mage Monkey - BOTM/Jetfire - Cybertron's Finest/General Miscreant/ASVS/Supermoderator Emeritus
Debator Classification: Trollhunter
Out Of Context theatre: Ron Paul has repeatedly said he's not a racist. - Destructinator XIII on why Ron Paul isn't racist.
Shadowy Overlord - BMs/Black Mage Monkey - BOTM/Jetfire - Cybertron's Finest/General Miscreant/ASVS/Supermoderator Emeritus
Debator Classification: Trollhunter
-
Shaka[Zulu]
- Jedi Knight
- Posts: 517
- Joined: 2002-08-20 03:24am
- Location: Ft. Lauderdale, FL USA
Re: Three fundamental errors in your argument, Zulu
hmmm... lets see...Patrick Degan wrote:From what I see, you made several critical errors in your entire approach to this problem:
ok, 2 parts to this one:1. You are arguing from the premise that the Death Star cannot be accomplishing the velocity necessary to close to intercept with Yavin-D and are trying to contort the evidence to fit the conclusion.
1. I see where the premise might be an issue... perhaps it should be that the DS did not perform that feat, not that it could not.
2. I fail to see where I have contorted evidence, unless you are saying that the initial data used for the calcs is faulty, and I am suffering from a massive case of GIGO. Somehow I doubt this, as we can clearly see or otherwise infer a) the size relationship of Yavin and Y4 b) Y4's orbit and its' highly elliptical (but not para- or hyperbolic) path and c) approximately where Y4 is in that orbital path (ie close to perigee). about the only things missing are exactly what is the vector of Y4's semi-major orbital axis relative to the vector passing thru the centers of both the DS and Yavin, and the masses of the giant and the moon, we can however render those particular issues moot simply by performing multiple iterations with differing values for those variables which are uncertain or unknown... I did as much before I put the original paper forth 3 years ago, including 1 scenario where the DS was only 50kkm away from Yavin... results were still within acceptable limits.
how is it that my dismissal of that display is stirring up such a hornets' nest? have I not listed my reasoning to anyone's satisfaction?2. You are arbitrarily dismissing the Rebel tactical display as unreliable evidence.
a) not to scale wrt either sizes or distances
b) only the DS moved any significant distance
c) the only reason the DS was the only thing moving is because the rebel display is operating on a very different frame of reference -- one based upon the vector passing thru the centers of both Yavin and Y4. This particular reference, being the basis of the display, never moves... thus everything else represented upon it must move, and will do so at a far greater pace than they really are. When calculating anything pertaining to orbital motion and/or navigation, one must be extremely careful to make sure that the frame of reference is the proper one for the intended tasks, or you will end up somewhere you most certainly do not want to be. That said, the rebel display is perfectly suited as a countdown clock... when it rings, you go boom! I just fail to see how, given the evidence, it can be trusted as anything else. what exactly makes this decision on my part arbitrary?
change that to angular velocity, and you will be spot on (yes it is an assumption, but it is reasonable). As I stated eariler in this reply, I performed a number of iterations covering various combinations of different values for those variables which are either unknown or highly vague, all of which based upon the proper frame of reference for this scenario -- one based solely upon Yavin itself. for any combination of variables whereby the initial DS countdown starts with Y4 in that position from the vantage point of the DS, and for a wide range of possible positions for Y4 within +/- 30 degress from perigee (accomplished by shifting both the axis and inclinations of Y4's orbit to keep it within the aspect presented on the DS screen), the calculations showed a time to LOS of between 25 and 36 minutes (IIRC... given the age of this memory, say +/- 1 minute either way)... contrary to what some might think, closer values for the DS distance to Yavin under these circumstances increase time to LOS, while those farther away decrease that time -- assuming a stationary DS of course. If the DS is in fact on the move, then it must have started the scenario much closer to Yavin than is apparent, as a stationary position at such an altitude would put time to LOS out to 36 minutes or more given that angular position relative to Y4... now I am perfectly willing to concede that it might have in fact been moving... but no way are you going to tell me that it was moving anywhere near as fast as Mike wishes it were, much less accelerating at such rates as he proposes... the math just will not support it without changing the starting variables so much as to render all the on screen evidence invalid -- try it and see.3. You are assuming that the Death Star's ranging display is representing the true orbital velocity of Yavin-D, and this on the assumption that the Death Star is simply occupying a stationary position or a geostationary orbit and "waiting" for Yavin-D to move out of opposition on its own momentum.
funny, I thought the math was the proof...Of these, the first is the fundamental error which undermines your entire case. You are assuming the premise of the argument as proof of the argument.
panty-stealing military mecha maniac
-
Shaka[Zulu]
- Jedi Knight
- Posts: 517
- Joined: 2002-08-20 03:24am
- Location: Ft. Lauderdale, FL USA
oops... in that last paragraph above, when I said that if the DS had to be much closer to be moving... it should be noted that the DS could be moving even if it were farther out from Yavin, but it would be moving even slower due to the combined effects of altitude on orbital velocity and the fact that Y4 would reach LOS sooner... either way, Mike's estimate is way off base
panty-stealing military mecha maniac